• HOME
  • YEAR 9
    • Assessment System
    • Inheritance
    • Plants >
      • Kitchen Garden Project
    • Acids and Alkalis
    • Energetic Reactions
    • Energy Resources
    • Mechanics
    • Environmental Science
  • IGCSE
    • Forces and Motion
    • Energy and Energy Resources
    • Solids, Liquids and Gases
    • Waves
    • Astrophysics
    • Electricity
    • Magnetism
    • Nuclear Physics
    • IGCSE revision
  • Physics I
    • Kinematics >
      • Variables and Units
      • Describing Motion
      • Equations of Motion
      • Problem Solving
      • Projectiles
      • Kinematics Animations
    • Dynamics >
      • Forces
      • Static Equilibrium
      • Newton's Laws
      • Friction
      • Advanced Problems
    • Gravitation and Orbits >
      • Circular Motion
      • Vertical Circles
      • Universal Gravitation
      • Orbits
      • Circular Motion Animation
    • Energy >
      • Work
      • Springs
      • PE and KE
      • Conservation of Energy
      • Work-Energy Theorem
    • Linear Momentum >
      • Impulse
      • Conservation of Momentum
      • Types of Collision
      • 2-D Collisions
    • Simple Harmonic Motion >
      • Mass on Spring
      • Pendulums
      • SHM Animations
    • Rotational Mechanics >
      • Torque
      • Rotational Kinematics
      • Rotational Dynamics
      • Angular Momentum
      • Rotational Energy
    • Mechanical Waves >
      • Waves on a String
      • Sound
    • AP-1 Revision
    • AP Physics C (Mechanics)
  • Physics II
    • Fluid Mechanics
    • Thermal Physics
    • DC Circuits >
      • Voltage and Current
      • Resistance
      • Series and Parallel
      • Internal Resistance
    • Electrostatics
    • Magnetic Fields >
      • EM Induction
    • Interference and Diffraction
    • Optics
    • Modern Physics
    • AP 2 Revision
  • OCEANOGRAPHY
    • The World Ocean >
      • What is Oceanography
      • History
      • Lat and Long
      • Size and Origin
      • Plate Tectonics
    • Seawater >
      • A Salty Sea
      • Measuring Salinity
      • Thermal Properties
      • Density Profiles
      • Drinking Seawater
    • Circulation and Climate >
      • Global Heating
      • Coriolis Effect
      • Surface Currents
      • Vertical Motion
      • Thermohaline Circulation
      • El Nino
      • Carbon Cycle
    • Waves and Tides >
      • Wave Motion
      • Formation of Waves
      • Beaches
      • Tsunamis
      • Tides
    • Observation Systems >
      • Challenges
      • The CTD
      • Moorings
      • Sound Waves
      • Robotics
      • Satellites
    • Weather and Navigation >
      • Weather Systems
      • Weather Forecasting
      • Hurricanes
      • Navigation
      • Life at Sea
    • Oceans and Mankind >
      • Ocean Acidification
      • Pollution
      • Fish Stocks
      • Climate Change
      • Energy Resources
    • Atlantic Explorer Cruise
    • ROVs
  • COLLEGE
    • College Physics I
    • College Physics II
  • CONTACT
Island Physics

RanDOM Ramblings

Teaching Physics Online

18/8/2020

0 Comments

 
Admittedly, this article is being written far too late!  As I suspect was the case with most of my colleagues in education, I was rather overwhelmed by the sudden transition to online teaching and learning.  There have been two definite phases in my case.  I was far better prepared for the second round than the first.  Also, there have been two distinct styles that I used depending on whether the students were middle and high school or from the college where I teach part-time.
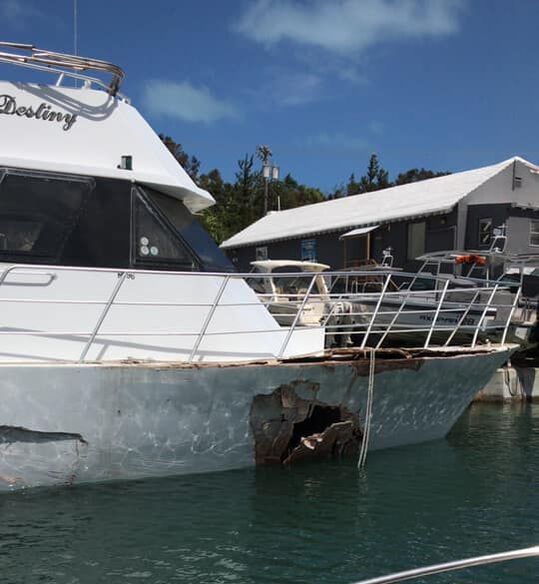
The first phase of remote teaching started March 2020 when the pandemic first hit Bermuda.  Luckily, I had a few days to grab stuff from school between lessons.  I loaded the car up with a whiteboard, markers, science equipment relevant to the topics that I was currently teaching and most importantly as it turned out, a fish eye webcam from an ROV that had not been sealed in a waterproof housing, a clamp stand and a box of large sketch paper that I found in the prep room.  I also converted a camping gas stove into a Bunsen Burner by hose clamping the tube to the top, although I am not sure that this was terribly safe.  It has since been upgraded to include a portable BBQ valve system, which provides both more control and security as it not prone to leaking...

After some trial and error, I realised that the Electroboom style of teaching with the whiteboard was basically useless.  The best set up ended up being having the ROV webcam mounted facing downwards held by the clamp stand over the paper while I wrote or drew on it with a fat black pen.  Incidentally, this is the preferred technique that Physics Girl on Youtube used for her Physics 1 videos.  She, of course, does it far better! 
Picture
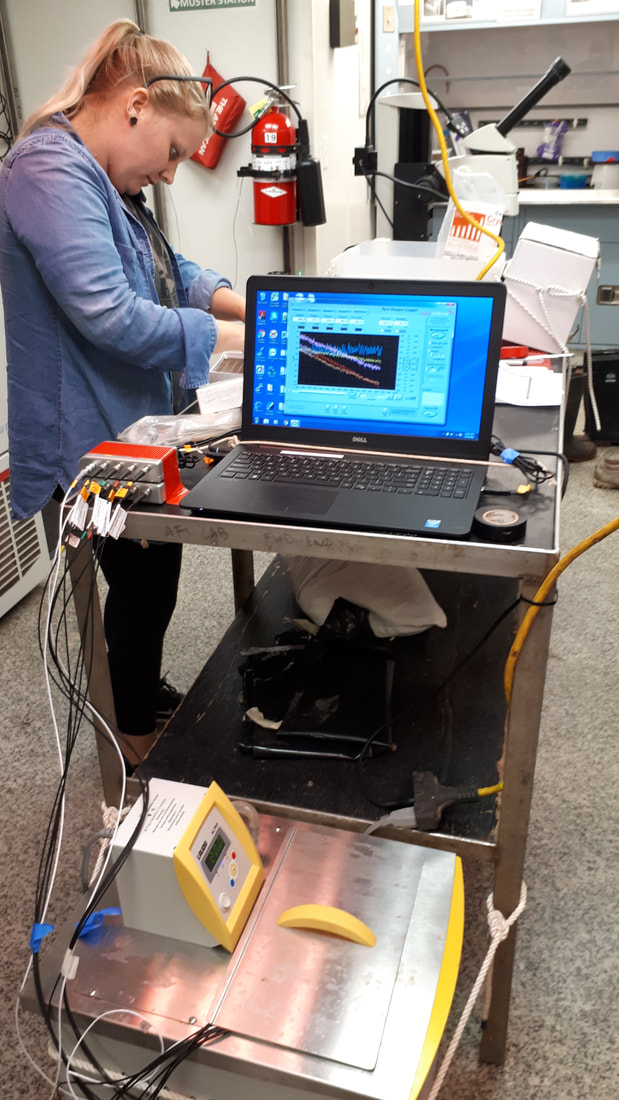
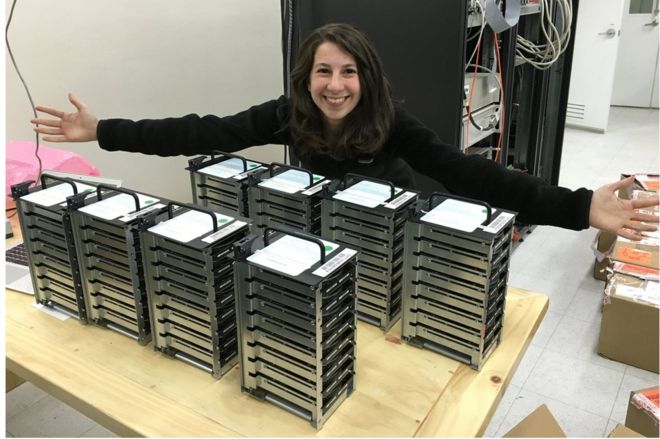
Rather grainy photo from my wife of me working at the start of the pandemic. She did not like the fact that I had moved into the living room. At the time the wifi did not work in the guest room.
With regards to the middle and high school students at Saltus, after some trial and plenty of error, I found that short lessons with a definite bite-sized goal to be achieved by the end of the session worked the best.  We already had an online portal powered by Blackbaud known as SaltusLive where notices, documents and links could be shared and students could upload their work.  Although we had not made full use of the features by March 2020, they were there and it did not take the staff and students long to figure out how to implement them.  Some teachers tried to upload short videos to explain a task or concept and then left the students to it to get the task finished more or less by themselves by a certain deadline.  Personally, I found that this did not work.  Most of the students did not bother to do the work properly or left until the last minute.  Also, I quickly found that just talking to the students for more than 15-20 minutes either directly with props or via a powerpoint presentation did not work very well either.  Short and sweet was the name of the game. 

​The school's online system has a subject 'bulletin board' which I found useful to put links and lesson schedules on.  Each day I would put the google meet time, lesson outline, relevant links and assignments on to the class bulletin board.  Having a routine where the students signed on at the start of class and then having to complete a very short assignment worked the best.  These assignments varied from a google doc or slide, screenshot of a finished PhET simulation or game to going outside and taking photos of them stirring salt into warm or cold water.  However, this did demand a good deal of follow up straight away with parents to keep tabs on some of the more work-shy students...


With the senior year students that were forced into online learning just prior to their AP exams it was especially difficult.  A third of my class simply 'checked-out' and never engaged no matter how much I implored their frustrated parents.  Not surprisingly, these students did not get the results that they were capable of.  Until the pandemic I had never really used AP Classroom.  It was a rather clunky and difficult website to use, but as it had all of the past questions built in and was an indication for how College Board were going to handle the online exams, it became a lifeline.
Picture
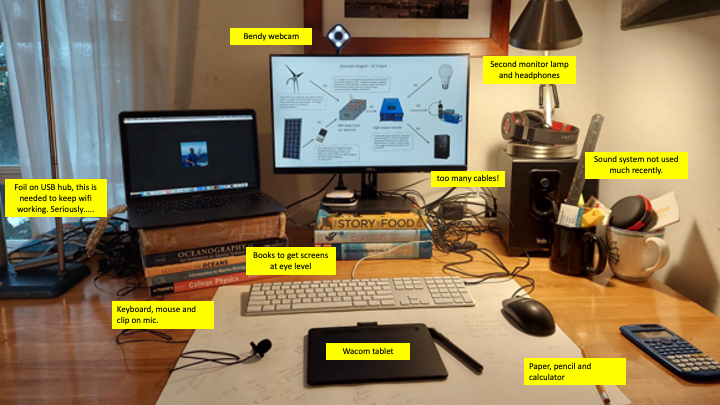
By the end of 2021, the arrangement had been refined considerably. The table has been raised on wooden blocks and a better chair was found. Rotating the desk avoided the glare from the southwest affecting the webcam.
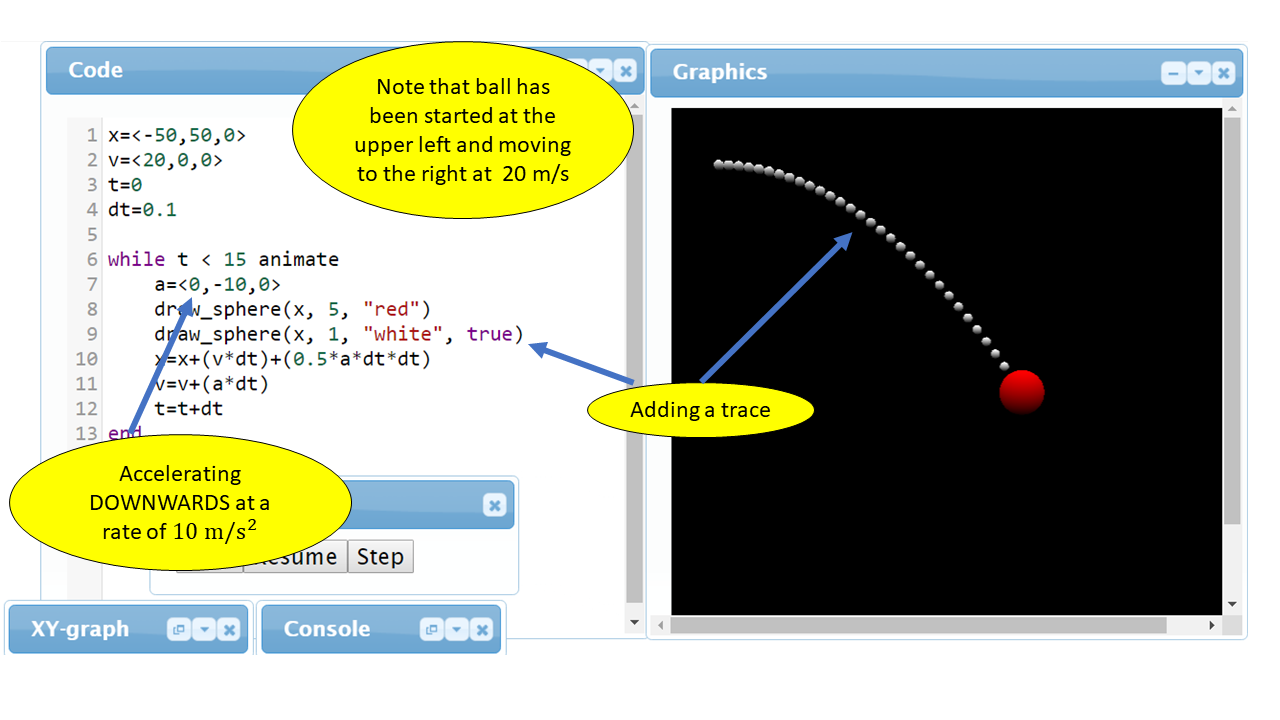
The second phase occurred after the summer vacation.  It was clear that while Saltus would be in person whenever possible, Bermuda College would stay being online. By this time I had done some research online to find out better techniques.  I invested in a good quality webcam and a Wacom tablet.  I should also have invested in a decent microphone at the same time, but foolishly didn't.  That came later.  The set up with Bermuda College was one three-hour lecture a week.  This seemed painful to both the students and myself!  So I changed the schedule to two shorter lectures instead.  I created powerpoint lectures that I could write on mixed with showing simulations from Ophysics and PhET or physical demonstrations.  As this was done over zoom, they could be recorded.  The recordings were then edited and uploaded onto Youtube.  I felt that this ended up being a rod for my own back as students often 'checked out' of my lectures (hard to tell as they never turned cameras on!) as they knew that they could just watch the recording later.  The records all suffered from poor quality sound.  Buying a clip on microphone eventually solved this.  Finally, investing in a second screen for the laptop was a godsend.  Especially when the school went back online with Google Meet being the video system.  Then the students can be on one screen while I presented the other - be it using a presentation, video, live webcam feed of an experiment or a simulation. 

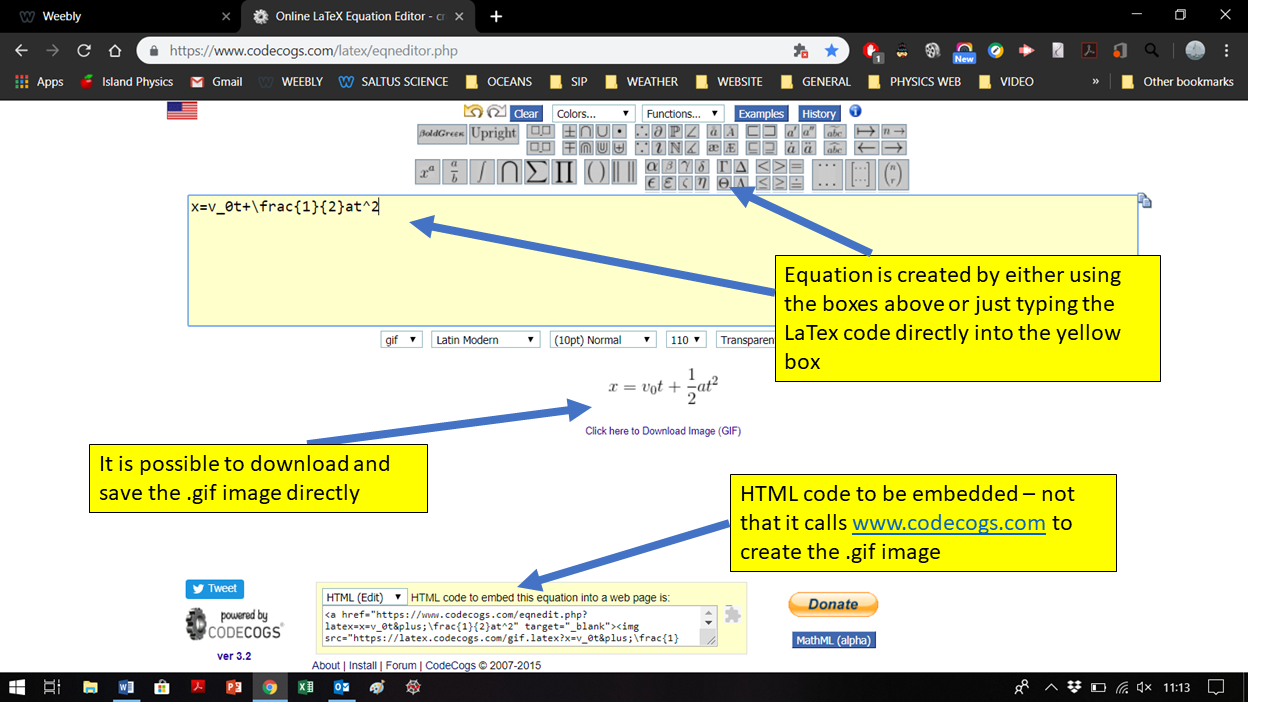
With regards to the lectures, these were generally broken down into chunks separated by 5 minute 'tea breaks'.  Lessons tended to include lecturing, Q+A sessions and breakout rooms.  Not altogether convinced that breakout rooms always worked.  Often I felt that I was neglecting the students in other rooms while I was dealing with one batch.  Perhaps if the students had the ability to write on a screen somehow then it would work better.  Tried Jamboard but for physics calculations it does not work very well.  In the end, google slides and having the students crudely typing the physics and maths into textboxes seemed to be the best solution.  Some of my colleagues used apps like Peardeck to great effect but I never really tried it.
Tech Challenges:
  • Videos.  Processing, editing, rendering and uploading videos is a time consuming and slow process.  Changing from the school laptop to a Mac speeds the process up significantly but required another learning curve as the windows software that I had purchased was not licensed for the Mac - why do they do this?  
  • Dongles.  My Macbook Air only has two ports, of which nothing I owned would fit into.  This meant that I had to purchase a USB C hub.  Turns out that even a fairly expensive one a) gets hot and b) interferes with the wifi.  This is a crippling problem and caused issues with a few lessons until I figured it out.  Turns out that it only affects Mac laptops and is solved by covering the cable with tinfoil.  I can attest that this unorthodox solution actually works.  Foil on - wifi ok.  Foil off - wifi terrible.  Someone has to re-engineer this stuff...  Incidentally, the USB hub also interfered with the Wacom tablet and caused spiking to occur randomly while I was writing.
  • Sound quality.  Only solved by investing in a decent mic.
  • Connecting devices.  Early on, I tried to use my phone as a webcam and mic.  Could not get the laptop and phone to connect to each other.  Looks easy on youtube, but could not do it.  Same with an attempt to use a school iPad as a writing tablet.  
  • Student uploads.  The new classic excuse is to share a google doc that the teacher cannot access.  Registers online that the student has uploaded the assignment, so parents are satisfied when they check on the system.  But still means that you cannot grade all the work at the same time and need to get chasing them.
  • AP Classroom.  Has improved quite a bit, but still very difficult to use effectively.
0 Comments

Oceans in the News (Summer 2020)

18/8/2020

0 Comments

 
Microplastics in the Atlantic BBC News 18 Aug 2020
Mauritius Oil Spill BBC News 16 Aug 2020
Robot boat crosses the Atlantic Ocean BBC News 15 Aug 2020
Robots in the Deep Ocean BBC News 15 Aug 2020
Ice Melt Guardian 20 Aug 2020
Mapping Currents in the Souther Ocean  NY Times 14 Aug 2020
Active Hurricane Season Forecast  NY Times 6 Aug 2020
0 Comments

Rapunzel - Social Distance Princess

22/3/2020

0 Comments

 
Another epic sandcastle from Hannah!
Picture
0 Comments

Sandcastles

23/2/2020

1 Comment

 
A friend of mine, Hannah Emmerson, is an amazingly gifted artist who has a passion for building sandcastles.  She runs the annual competition that is on Horseshoe Bay Beach every September.  Below are just a few of her incredible builds.
Picture
23 Feb 2020 - the rocket and the alien were inspired by the news that a man who built a home-made rocket in the US died during a test flight.
Picture
Picture
16 Sept 2020 - A hurricane approaching the island inspired the "storm in a tea-cup". The ship represents the "Sea Venture" which was wrecked off the east end of the island after battling through a hurricane in 1609. She started the colonisation of the island and the story of the shipwrecked sailors inspired "The Tempest".
Picture
Hannah and her creation!
Royal Gazette article about her art work.
Picture
19 April 2019 - Easter combined with her fascination with the Rex family (soon to a be a book!)
1 Comment

Hurricanes

20/9/2019

1 Comment

 
I will post more about the physics and forecasting of these giant heat engines.  Right now, this is mainly to state that I am officially done with the damn things.  Hurricane Ivan sank my boat Enchantress in Grenada back in 2004.   Enchantress was a 47' catamaran that was my job and my home in the  Windward Islands.  A few days ago Hurricane Humberto, which was supposed to a fly by, sank Vixen.   Vixen was a race boat that I had rebuilt 9 years ago after I bought her cheap from a yard that was going to scrap her.  Both were sunk as they were hit by much larger boats breaking free and smashing into them.

Not to mention that my home, 'Sundeck', took a beating as it in on a hill side and exposed to the south and south west - exactly the direction that the winds came from.  At least the roof stayed on.  Some shutters and the front door didn't though. Electrics are frazzled as the neutral wire came down and the voltage went crazy when they turned the power back on.  Outlet circuits and built in appliances are toast.  At least, unlike  Hurricane Dorian, no one on the island died,  a testament to the study construction of Bermuda's houses.

Hurricane Jerry is now looking at a direct hit next week.....
Picture
Picture
MV Destiny, the culprit.
Picture
Picture
1 Comment

Coding Simulations

9/8/2019

1 Comment

 
Picture
I decided to start including some coding into the AP Physics I course this coming year.  The reason for it was to try to increase the level of understanding of how objects move.  Especially the idea that motion can be broken into components and that a constant acceleration can change the direction of motion.  In order to produce a realistic animation of a moving object, for example a projectile, a student must have a good understanding of the physics involved.  If the physics is wrong, then the animation will not realistic.  Fairly sure that is the basis of the Matrix and Inception?  Anyway...

So, then I started investigating and trialing a number of languages.  Ideally I wanted something that was easy to install and get to grips with as I definitely did NOT want to teach the students complicated syntax and compiling (so Fortran was out), or that costs money (ditto Matlab).  As the IT dept teaches Python, I tried that out using an online tool called Trinket.  This looked promising as a basic code could be embedded into this website and the students could modify and play with it.  The problem was that the syntax of Python, or rather Glowscript, is not terribly easy to get to grips with.

So, I found PhysGL which appears to fit the bill.  It is free and online, although I cannot embed either the code or the animations.  The syntax seems pretty intuitive, which is ideal, and the simulations look pretty nice.  There are a couple of downsides, a) there is not too much in the way of instruction manuals, so I have had to work a bit out myself using trial and error, and b) as it is online and runs through the web it can be slow.  This is especially a problem as using long time intervals can lead to errors.  I need to think more about the circular motion and SHM simulations when I am back in Bermuda and with a faster laptop.  However, for the basic kinematics stuff in both one and two dimensions (or three?!) it seems ideal.     

The idea is to focus entirely on the physics and the logic behind how animations, kinematics and dynamics work in ever shorter steps, and not the nuts and bolts of the language itself.  
The basic structure of any animation code is:
  • define parameters and variables
  • draw a background, if required
  • run the physics inside a loop
  • display vectors and/or a trace
​
​So, the plan is to include this activity along with the usual labs and problem solving in class.

1 Comment

Typing Equations

7/8/2019

0 Comments

 
Most of this past week has been spent reformatting the AP-1 section of this site.  I hadn't intended to, was just going to add some updates and shuffle some sections around to match the updated syllabus from College Board.  However, this quickly turned into a nightmare job as the weebly editor was slowing down to the point of being unusable.  After a long chat with the people at weebly, it was determined that the large pages of equations were the problem.  This was partly discovered as the older pages which I had included the equations using Codecogs were the cranky ones, while the Mathjax ones that I have been doing since last Easter were running well.  So, ended up dividing the AP-1 pages into smaller sub-pages and re-writing ALL of the equations. 

So, what are the two methods:

CodeCogs
This is a website, www.codecogs.com, that you can use to create an equation and then gives you a HTML code that you can embed into your webpage.  The equations look pretty good, if a little bit fuzzy.  It turns out that it works by calling up the website, coding the equation to form a .gif image file and then downloads it into the editor.  So the equation is actually an image that is uploaded to codecogs, and downloaded every time I edit the page.  My website user's browsers just then downloads it as an image file along with everything else.  It had been working well, but I suspect that as the codecogs server was being overwhelmed, it ran slow.  It also highlighted the fundamental inefficiencies of the system. Not to mention that in order to look right I had had to add invisible dividers above and below each equation.  As the CodeCogs system somehow didn't work on the blog pages when I was writing about Black Holes, I hunted for another method, which is far better.
Picture
Picture
MathJax
To use this system I had to install the free app into my weebly editor - which took maybe 2 minutes.  Took me a bit longer to get the hang of using it though.  The advantage is that the equations are far easier to include, the text block are not broken up, no dividers are required and the equations look far sharper when viewed on the final webpage.  A disadvantage is that it is not possible to see what the equation actually looks like in the editor.  The code that MathJax uses is not exactly the same as that from CodeCogs, but the differences are small. ​  Which is a good thing as CodeCogs is probably the easiest way to figure out the LaTex code!
Picture
This page renders really nicely when the user opens the page on their browser:
Picture
WORD
So, all this work got me thinking whether there was a more efficient way to include equations into a WORD document.  And it turns out that there is!  Using the included Equation Editor has always been a bit painful and slow, although the equations look nice when it is finished.  Turns out that if you open an equation editor box in WORD as normal, you can just type in the LaTex code directly and press ENTER when you have finished, which then compiles the equation.  A lot quicker and less fiddly than the graphical method.  This does not work on POWERPOINT though, so stuck with the normal method.
Picture
GoogleDocs
This is somewhat harder.  The built-in equation editor is very clunky, basic and doesn't produce good results, although given the advantages or sharing documents and that it is free is not a dealbreaker.  There are some third party apps that you can "ADD ON" so be able to insert LaTex code to produce better looking equations but they are not easy to use and say unhelpful things like "require access to your google account"....

Top tip for using google docs built-in editor, use the TAB key to jump from one area to another.  Especially useful as it is next to impossible to see the boxes.


0 Comments

R/V Atlantic Explorer

25/5/2019

0 Comments

 
What a week it has been!  Just back from a 4-day professional development voyage on the BIOS research ship, Atlantic Explorer, and feel even more energised and inspired to start teaching the Oceanography course in September.  This past December I was finally given the SGY2 (grade 12) course to make my own, with the instruction to make it more relevant and inquiry-based.  This trip followed hot on the heels of receiving the news that my REMUS project proposal to have the students assist in the mapping of the temperature and salinity changes due to the reverse osmosis plant at Tyne's Bay had been approved.  The cruise (as they are called) was scheduled to do research on zooplankton and my berth was arranged by BIOS's marine science education coordinator Kaitlin Noyes as there was a space for a second observer aboard.  The other observer, Marcus, was a student from another school on the island who has been studying  and volunteering at BIOS and is trying to decide on what to study at college.
Picture
The end-of-cruise group photo of the zooplankton scientists and two observers. The lead scientist, Amy Maas, is third from the left in the front row.(Photo by Kaitlin Noyes)
While I have spent time on research ships in my career as an oceanographer, I had never been on a ship studying either biology or chemistry.  Both cruises were solely physics, involving mooring work and CTD sections.  So it was both useful and fascinating to see the other aspects of marine science being brought out of a textbook and into reality.

The project was to investigate how and why zooplankton migrate vertically from 150 m to 450 m on a daily (diurnal) basis.   

Firstly what are zooplankton?!  The ocean is teeming with life, from the smallest of algae to huge great whales.  Some of these organisms can swim, e.g. fish and sharks, others just drift with the wind and currents.  These drifters are called plankton.  If they are plants they are called PHYTOPLANKTON, and if they are animals they are called ZOOPLANKTON.  As on land, the base of the food chain are plants as they can use the sun's light energy to convert water and carbon dioxide into food and oxygen.  These plants can range in size from single celled algae to phytoplankton and up to seaweed - and we saw a lot of sargassum  on this trip.   The zooplankton eat the phytoplankton.  Fish etc eat the zooplankton and the phytoplankton.  The zooplankton (critters) are a wide ranging bunch of funny looking things.  Some that we collected would just whoosh around in distracting circles.  Others were really hard to see.  But it is their overall behaviour that is odd.  During the day - shortly after dawn  - they swim down to the depth of approx 450 m, where there is no light and little or nothing to eat.  At dusk, they swim back up to the 'shallower' depth of 150 m.  Given that these things are tiny - usually less than a few millimeters long - this seems like an epic amount of work!
​
Picture
A general image of zooplankton - greatly enlarged. Average size is about 1 mm. (wikipedia)
Picture
One of Amy's captured copepods (a species of zooplankton). To give a sense of scale, the curved dent in the glass dish that it is in is about 10 mm across. (Kaitlin Noyes)
Why on Earth are these little obscure sea creatures worth studying?  Well, it turns out to a major part of the global carbon cycle.  Zooplankton feed at shallow depths and when they descend they defecate (poop).  This effectively forms part of an active transportation of organic carbon from the surface to the deep ocean.  The ocean absorbs carbon dioxide at a slighter greater rate than first thought.  According to some estimates the daily migration of zooplankton contributes between 15 and 40% of the global carbon sequestration!  In terms of biomass it is the single largest mass migration on the planet.  Theories as to why they migrate up and down include:
  • staying in the dark to avoid predators during the day
  • rising up to feed as a greater density of phytoplankton and algae at 150 m.
  • a circadian rhythm

There were a number of experiments that were carried out aboard the ship over the four days of the cruise.
Respiration
A certain species of zooplankton, called copepods, were captured in a huge net called a 'MOCNESS' that was trawled over the stern at different depths.  Records were made of which depths resulted in the greatest numbers of zooplankton.   Some of these copepods were then put into tubes that contained highly filtered seawater and then placed in a sophisticated water bath to control the temperature.  One tube was left without a copepod as a control.  Over time the percentage of dissolved oxygen in the tubes decreased due to the respiration of the copepod.  Over the three days of the experiment, the copepods did not slow their rate of respiration at all.  This may have an effect on the circadian rhythm theory.
Picture
Picture
A photo of the laptop screen recording the respiration data. The steady line is the temperature data. The yellow line is the dissolved oxygen in the control tube, while the others show a consistent decline in oxygen over the 3 days of the experiment. This shows that copepods do not slow their respiration rate according to a circadian rhythm.
Poop
The hilariously named zoop-poop experiment was to try to determine when the copepods defecate and how much.  They produce poop pellets.  Do they only do it at depth or in the dark, or do they continuously poop?  Copepods were collected as before and placed in containers of finely filtered water (to 0.2 microns).  They were placed in controlled conditions and after a period of time the water run through a filter and the mass of poop measured.

Picture
Shannon from Miami showing off her poop filters!
Picture
A terrible photo of the poop filters after a run. The filter on the left has the poop, the one on the right is the clean filter from the control water.
DNA and RNA extraction
A large number of copepods from different depths were collected and frozen in liquid nitrogen for genetic analysis back at the University of Washington.  

Urea and Ammonia Sampling
Samples of water at different depths were collected for future measurements in the lab of the concentrations of urea and ammonia - nitrogen compounds as the bacteria that surround the zooplankton are a major part of the nitrogen cycle, where nitrogen is fixed into nitrates.

Isotope Analysis
Other samples of seawater were collected and stored for processing through a mass spectrometer ashore to determine the relative abundance of the stable isotopes of carbon and nitrogen - again as part of the ongoing investigation into the carbon and nitrogen fixation.
Picture
Illustration of the MOCNESS used to collect zooplankton. A rather awkward piece of equipment with a number of nets that can be opened or closed at specific depths.
Picture
A smaller 'reeve' net that can be trawled over the stern at a depth that is determined from the length of cable that is paid out. Not as effective as the MOCNESS, but a lot simpler to use!
Routine Data Collection
Every ship that goes out always uses some of its time for the routine measurements of temperature, salinity, fluorescence, dissolved carbon dioxide and oxygen and bacteria.  Fluorescence gives an indication of the amount of chlorophyll in the water column, although it can be inaccurate really close to the surface as the sunlight can bleach it out.  This can be directly useful as it helps to decide on the depths to deploy the MOCNESS.

Picture
Preparing the CTD to be lowered over the side. It is capable of going up to 7000 m deep, but we only lowered it to 1000 m as we were still relatively close to the island. The CTD (conductivity, temperature and depth) instrument package is surrounded by specially designed tubes that can collect water at specified depths. These are controlled in real time by the operator.
Picture
Me filtering water for the various controlled experiments. This was a slow job as the filter was down to 0.2 micron, so could even get rid of most bacteria. (Kaitlin Noyes)
Over the four days I helped with the data collection and prepping some samples for further tests and worked a great deal on putting together material next year's oceanography course.  Probably one of the happiest, most satisfying and constructive professional development time that I have ever done.  A big thank you to Kaitlin for organising it, to the 'zoopgroup' for putting up with my constant questioning, the crew of the Atlantic Explorer who were more than happy to entertain having a sailor on their bridge and, finally, my head of school for allowing me time off to undertake the cruise.

0 Comments

Bermuda Kites

19/4/2019

0 Comments

 
Today is Good Friday and here in Bermuda is all about codfish cakes, hot cross buns and flying homemade traditional Bermudian kites.  It was a great SW breeze, sunny and low humidity today, possibly the most perfect day to fly kites!  Mine didn't go so well though, flew for a bit and then the spindle I was holding broke into two and got out of my hands.  I chased the remaining bit as the kite soared away before it got stuck in an oleander hedge.  The kite lost control and crashed in the neighbour's garden.  Sadly they were away and have three really scary dogs,  who savaged the kite!  Oh well....  next year we will go to the beach to fly it instead.  So, no photos of the kite.  Bermudians take a huge amount of pride in kite making and there are a lifetime of tips and tricks to learn.  They are quite fiddly to make and require some patience.  My friend Hannah is an artist and produced the kite of a lizard that is shown below for the Ag Show last week.  Today she was making a sandcastle version of a baby T-Rex being hatched from an easter egg at Horseshoe Bay.
Picture
Picture
Anyway, after my disastrous excursion into paper aviation, I sat and watched others being far more successful and thought about how kites actually fly......

Once the kite is airborne there are four forces acting on it:  weight, drag, lift and the tension of the string.  The lift force is the most important and the one that holds the kite aloft.  Lift is generated when air flows over the surface of the kite as it is held at an angle to the wind.  This angle is critical and is known as the 'angle of attack'.  If the angle is too shallow, there is not much lift generated and the kite falls.  If the angle is too steep, the air flow is disrupted by the kite and the kite stalls and falls down.   So, being able to control this angle is critical to a successful kite.   The higher the kite is, the stronger the wind speed and the greater the lift.
Picture
The angle of attack is controlled by:
  • Placement of the bridle (called 'de loop' by Bermudians).  The measurements of these are very precise.  The one from the middle must be as long as the top curved section, the two that come from the ends of the curved section must go to an inch below the centre of the kite sticks.  If these are incorrect, the angle of attack won't be within flight range.  
  • The angle and tension of the kite string - must be forwards and downwards!  Which is why it is so important to pull downwards a bit on the line as the kite is being thrown upwards when it is being launched.
  • The drag and weight of the kite - which is significantly affected by the length and weight of the tail - usually lengths of bed sheets that have been torn up and knotted together.   Note that the centre of mass of the kite is moved backwards from the geometric centre by the mass of the tail. 
Without the tail, the kite would be unstable and jitter around all over the place.   The idea is that the centre of drag lies behind the pivot point (loop) so that the kite maintains a head-to-wind attitude.  The curved section at the top (where Hannah's lizard head is), aids the airflow over the kite and produces a more natural aerofoil than would be obtained from a flatter kite section.

Hummers - these are strips of tissue that are mounted on strings from the headstick to the top of the curved section.  They are free to vibrate and produce a loud noise.  Hannah's hummers are white with black spots on them. If made from stiff paper (grocery bags) or plastic they can be very loud and extremely annoying!  
Picture
One year, some inventive people from St David's tried to launch a huge kite made from 12' lengths of 2" x 4" timber.  Unfortunately, despite being dragged by a pick-up truck, it was not successful.  The reason was obvious to me as a physicist, unless it was blowing a gale the lift generated would not exceed the weight of the kite until the kite was very high and the angle of attack from a 'normal' style launch would be too steep and the kite would stall.  Possibly if they had chosen a really windy day and mounted the kite at a shallow angle on top of the pick-up truck with a securely mounted spool for the line, and then they drove fast down a road straight into the wind - unspooling the line as the kite gained lift - they may have been successful!
Picture
0 Comments

Black Holes

12/4/2019

0 Comments

 
Picture
Image from EHT via BBC News
It has been a very exciting time in astrophysics this week, with the first ever image of a black hole published across the news.  Here is a link to the BBC Science article.   So I thought that it would be a good exercise to do some AP-style physics on some of the data that has been published.  I have simplified things a bit as I don't know how to do calculations on rotating black holes and general relativity!

Size
The article states that the diameter of the event horizon is 40 billion km and its mass has been determined to be some 6.5 billion solar masses.  The mass could be calculated from the orbital speed (determined by the Doppler Effect) of the matter that forms the accretion disk surrounding the black hole, but no data on that is given in the article.  So, turning to classical physics, the event horizon is the radius where the escape velocity is equal to the speed of light.  The escape velocity is calculated from the law of conservation of energy.
\[KE_{lost}=PE_{gained}\]
\[\frac{1}{2}mv^{2}=\frac{GMm}{r}\]
A quick bit of algebra gives us:
\[r=\frac{2GM}{v^{2}}\]
\[r=\frac{2 \times 6.67\times 10^{-11}\times 6.5\times 10^{9} \times 2.0 \times 10^{30} }{(3\times10^{8})^{2}}\]
\[1.93\times 10^{13}\;\mathrm{m}\]
which gives a diameter of 38.5 billion km, which is very close to that quoted in the article!
Picture
Picture
The Rayleigh Criterion is the minimum separation that two point sources of light can have in order to be resolved as separate sources by an observer.  The blurring or spreading of the image is caused by the diffraction of light through the aperture of the observer's telescope lens.
Interferometry

Essentially the limit of what we can see is determined by Rayleigh's Criterion (see AP-2 Unit 15), where the objects in question must diffract through the aperture of the telescope by less than their separation.  The variables that affect this are the diameter of the aperture through which diffraction occurs (the opening at the business end of a telescope), the subtended angle of the object, which depends on its size and distance from us, and finally, the wavelength of light observed.  The article does not specify the wavelength, but says that it is the high frequency end of radio.  Assuming that this value is 0.1 m, lets use the Rayleigh Criterion to determine the maximum size of the black hole that can resolved at the stated distance of 55 million light years using the EHT array shown above.

The Rayleigh Criterion for a circular aperture is:
​
\[\sin{\theta}=\frac{1.22 \lambda }{d}\]
As these are incredibly small angles the sine and tangent of the angle will be the same.
\[\frac{O}{A}=\frac{1.22 \lambda }{d}\]
where O = diameter of the black hole, A = distance from the Earth and d = diameter of the telescope.  Remembering that a light year is the distance traveled by light in one Earth year. 
\[\lambda=\frac{(40\times10^{9}\times10^{3}\times12000\times10^{3})}{(1.22 \times55\times10^{6}\times3\times10^{8}\times3.15\times10^{7})}\]
\[\lambda=7.57\times10^{-4}\;\mathrm{m}\]
which is in the microwave to infrared region of the EM spectrum.  Although I am sure that the effects of red shift due to both the expansion of the universe and the intense gravitational field of the black hole would have a significant effect on this calculation!
So, why would the black hole be a) so large and b) rotating?  The large part is easiest to understand, as the gravitational field is so strong matter would be drawn into the black hole, increasing its mass.  As its mass increases, the event horizon would expand further outwards and the gravitational field strength would further increase, creating a positive feedback cycle.  Eventually one could imagine that the black hole at the centre of that galaxy eventually consuming the entire galaxy.  Scary thought.  It may be possible to orbit a black hole, but the friction due to other incoming matter would probably cause the orbit to be unstable and quickly decay.  It is observed that stars rotate or spin.  It seems that the angular momentum of the star and its planets remains constant during stellar and planetary formation, therefore as the star's core collapses further to form a black hole, its angular velocity would increase.  Here, of course, we have another problem with classical physics.  As the black hole shrinks to a zero radius at its singularity (we think), then it angular velocity would tend towards infinity, which is certainly greater than the speed of light....  ah.....

Much has been reported about the fact that the team leader of this impressive international project is female.  What is astonishing is that this should be surprising!?  I know of at least two Bermudian females that have studied or are studying astrophysics at university.   Girls can be every bit as geeky as boys ya know.  
Picture
Katie Bouman, the MIT grad student that compiled all the synchronized data to form the image of the black hole. Photo from Katie Bouman via BBC News.
0 Comments
<<Previous

    Archives

    August 2020
    March 2020
    February 2020
    September 2019
    August 2019
    May 2019
    April 2019
    January 2019
    December 2018

    Categories

    All

    RSS Feed

    Older Posts
  • HOME
  • YEAR 9
    • Assessment System
    • Inheritance
    • Plants >
      • Kitchen Garden Project
    • Acids and Alkalis
    • Energetic Reactions
    • Energy Resources
    • Mechanics
    • Environmental Science
  • IGCSE
    • Forces and Motion
    • Energy and Energy Resources
    • Solids, Liquids and Gases
    • Waves
    • Astrophysics
    • Electricity
    • Magnetism
    • Nuclear Physics
    • IGCSE revision
  • Physics I
    • Kinematics >
      • Variables and Units
      • Describing Motion
      • Equations of Motion
      • Problem Solving
      • Projectiles
      • Kinematics Animations
    • Dynamics >
      • Forces
      • Static Equilibrium
      • Newton's Laws
      • Friction
      • Advanced Problems
    • Gravitation and Orbits >
      • Circular Motion
      • Vertical Circles
      • Universal Gravitation
      • Orbits
      • Circular Motion Animation
    • Energy >
      • Work
      • Springs
      • PE and KE
      • Conservation of Energy
      • Work-Energy Theorem
    • Linear Momentum >
      • Impulse
      • Conservation of Momentum
      • Types of Collision
      • 2-D Collisions
    • Simple Harmonic Motion >
      • Mass on Spring
      • Pendulums
      • SHM Animations
    • Rotational Mechanics >
      • Torque
      • Rotational Kinematics
      • Rotational Dynamics
      • Angular Momentum
      • Rotational Energy
    • Mechanical Waves >
      • Waves on a String
      • Sound
    • AP-1 Revision
    • AP Physics C (Mechanics)
  • Physics II
    • Fluid Mechanics
    • Thermal Physics
    • DC Circuits >
      • Voltage and Current
      • Resistance
      • Series and Parallel
      • Internal Resistance
    • Electrostatics
    • Magnetic Fields >
      • EM Induction
    • Interference and Diffraction
    • Optics
    • Modern Physics
    • AP 2 Revision
  • OCEANOGRAPHY
    • The World Ocean >
      • What is Oceanography
      • History
      • Lat and Long
      • Size and Origin
      • Plate Tectonics
    • Seawater >
      • A Salty Sea
      • Measuring Salinity
      • Thermal Properties
      • Density Profiles
      • Drinking Seawater
    • Circulation and Climate >
      • Global Heating
      • Coriolis Effect
      • Surface Currents
      • Vertical Motion
      • Thermohaline Circulation
      • El Nino
      • Carbon Cycle
    • Waves and Tides >
      • Wave Motion
      • Formation of Waves
      • Beaches
      • Tsunamis
      • Tides
    • Observation Systems >
      • Challenges
      • The CTD
      • Moorings
      • Sound Waves
      • Robotics
      • Satellites
    • Weather and Navigation >
      • Weather Systems
      • Weather Forecasting
      • Hurricanes
      • Navigation
      • Life at Sea
    • Oceans and Mankind >
      • Ocean Acidification
      • Pollution
      • Fish Stocks
      • Climate Change
      • Energy Resources
    • Atlantic Explorer Cruise
    • ROVs
  • COLLEGE
    • College Physics I
    • College Physics II
  • CONTACT